
In today’s fast-paced world, convenience reigns supreme. Customers expect efficient laundry services, and that translates to streamlined operations for your laundromat. Curbside Laundries understands this challenge, which is why we offer the innovative Curbside Laundries Razor POS system. This powerful tool empowers your staff and elevates your laundry service with a sleek design and intuitive interface. Don’t just take our word for it – follow this guide to set up your Razor POS system in minutes and unlock the potential of efficient laundry management!
Before You Begin:
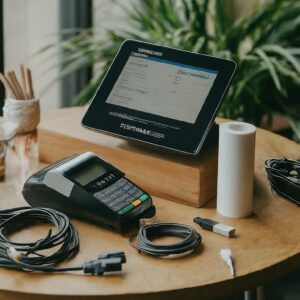
- Ensure you have a compatible Razor POS system, TM30 printer, power cords, USB cables, cash drawer cable (optional scale with USB cable), and a paper roll for the printer.
 Setting Up the Curbside Laundries Razor POS System:
 Setting Up the Curbside Laundries Razor POS System:
1.Power Up:
- Connect the power cord to the DC adapter and plug it into the Razor.
- A green light on the adapter indicates a successful connection.
2.Connecting the Display:
- Locate the DC in Port on the Razor.
- Plug the 4-pin connector firmly into the port.
3.Checking Functionality:
- After plugging in, you’ll see lights turn on and hear a beep.
- The Curbside logo appearing on the screen signifies a successful startup.
Unveiling the Razor’s POS System Features:
- Effortless Navigation: The Razor’s touch screen allows for intuitive and efficient operation, saving you valuable time (see image of Razor POS system touchscreen).
- Flexible Positioning: The screen rotates 180 degrees for optimal placement within your laundromat.
- Built-in Convenience: Process magnetic stripe cards for quick and easy payments, keeping transactions smooth.
- Versatile Connectivity: The Razor offers various USB ports for diverse functionalities, allowing you to connect essential peripherals.
Setting Up the TM30 Printer:
1.Unboxing Essentials:
- The printer kit includes the printer unit, USB cable, power cord, and paper roll.
- Connect the power cord to the DC adapter and plug it into the printer.
2. Accessing Ports:
- Remove the bottom cover for easy access to power, cash drawer, and USB slots.
3. Connecting the Cables:
- Match the labeled plugs on the printer with the corresponding connections:
- 3-pin 24 volt connection
- Printer USB cord (pentagon shape)
- Cash drawer cable (one-way, if applicable)
- Match the labeled plugs on the printer with the corresponding connections:
4. Paper Loading:
- Lift the tab to open the printer.
- Ensure the paper feeds from the bottom and load the paper roll.
- The printer will automatically cut a test sheet.
5. Connecting to Razor POS System:
- Plug the USB cable (one end) into a free USB slot on the Razor.
Cash Drawer Connection (Optional):
1. Locate the Slot:
- Find the labeled cash drawer slot on the Razor.
2. Connect the Cable:
- Plug the cash drawer cable (correctly labeled end) into the cash drawer slot.
3. Test the Drawer:
- A satisfying snap should confirm a secure connection.
Connecting the Scale (Optional):
1. Power Up the Scale:
- The scale doesn’t require a separate power cord.
2. USB Connection:
- Connect the USB B cable to the designated slot on the scale.
- Plug the other end of the cable into a free USB slot on the Razor.
Congratulations!
You’ve successfully set up your Curbside Laundries Razor POS system. This user-friendly system is ready to revolutionize your laundry experience by streamlining operations and boosting efficiency.
Additional Notes:
- The Razor POS system comes with pre-installed drivers for seamless operation.
- The USB connection offers a more reliable connection compared to Bluetooth.
We hope this guide empowers you to get started with your Razor POS system. If you have any questions, feel free to reach out to the Curbside Laundries support team.
